Acrylic is one of the most popular plastics in modern manufacturing. It offers excellent optical clarity, high tensile strength, and outstanding weather resistance. Because of these traits, product designers frequently select it over glass for impact-resistant windows, medical devices, and high-end retail displays.
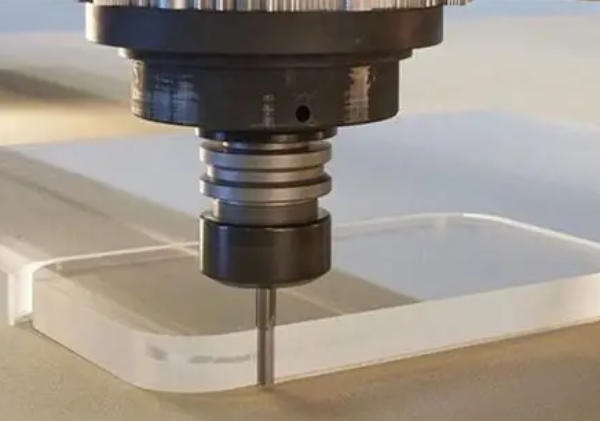
However, precision manufacturing with this material presents unique challenges. During acrylic cnc machining, machinists frequently encounter frustrating issues. These include localized melting, material cracking, severe tool gumming, and cloudy, chipped edges. Acrylic is highly sensitive to heat and mechanical stress. Achieving a crystal-clear, mirror-like finish straight off the mill requires a deep understanding of the plastic’s behavior. It also demands precise control over cutting parameters.
This comprehensive technical guide provides a proven, step-by-step framework to master acrylic cnc machining. Whether you are a custom prototype maker, an industrial CNC operator, or a manufacturing engineer, this article will help you optimize your production. We will cover everything from material selection and tooling geometry to speed calibration, cooling strategies, and stress-relieving post-treatment.
Understanding Acrylic Material
Properties of Acrylic
Acrylic, known chemically as Polymethyl Methacrylate (PMMA), is a rigid, transparent thermoplastic. It boasts a light transmission rate of 92%, which surpasses many grades of standard glass. The material has a density of $1.19 \text{ g/cm}^3$, making it less than half the weight of glass.
While acrylic possesses excellent dimensional stability, it has a relatively low melting point. Its glass transition temperature ($T_g$) sits between 100°C and 105°C. Because it is a brittle polymer, high mechanical stress causes immediate micro-cracking, also known as crazing. Understanding these thermal properties is crucial for successful acrylic cnc machining.
Types of Acrylic Sheets
When sourcing material for acrylic cnc machining, you must choose between two primary types. These are cast acrylic and extruded acrylic. Their manufacturing methods give them vastly different machining properties.
| Property / Feature | Cast Acrylic (Recommended) | Extruded Acrylic |
| Manufacturing Method | Liquid monomer poured into molds | Continuous mechanical extrusion |
| Molecular Weight | High molecular weight | Low molecular weight |
| Melting Point | Higher thermal resistance | Lower melting point (melts easily) |
| Machining Behavior | Swarf forms clean, crisp chips | Swarf becomes gummy and sticky |
| Cracking Risk | Low risk of stress cracking | High risk of cracking and chipping |
| Best Application | Complex CNC milling, optical parts | Simple laser cutting, basic panels |
At Moshijia Technology, we always recommend cast acrylic for high-precision CNC components. Extruded sheets retain high internal stress. When a CNC tool cuts into extruded acrylic, the material often melts, wraps around the cutter, and cracks along the machined path.
Advantages of Using Acrylic
- Optical Clarity: It delivers superior light transmission for lenses and light guides.
- Impact Resistance: It is up to 17 times more impact-resistant than standard glass.
- Chemical Resistance: It resists aliphatic hydrocarbons, alkaline solutions, and dilute acids.
- Lightweight Profile: It reduces the total weight of industrial assemblies.
- Excellent Finish: It can be polished to a perfectly transparent, museum-quality finish.
Tools and Equipment Needed
CNC Machine Types
High-quality acrylic cnc machining requires a rigid machine platform with excellent vibration dampening.
- CNC Routers: These are ideal for large, flat sheets, signs, and architectural panels. They require high-speed spindles to maintain correct chip loads.
- CNC Mills: Industrial 3-axis and 5-axis vertical machining centers (VMCs) are best for tight-tolerance optical parts. They provide the structural rigidity needed to prevent tool chatter. Chipping often occurs when a machine flexes during a cut.
Essential Cutting Tools
Standard carbide tools designed for aluminum or steel will ruin an acrylic workpiece. Acrylic demands specialized tool geometries that slice the plastic cleanly without generating friction.
Standard Cutter (Crushes Material)       Acrylic O-Flute Cutter (Slices Material)
       / \                                        /|
      /   \                                      / |
_____/_____\_____                         ______/  |_____
  [Micro-Cracks]                            [Clean Cut]
- Single-Flute O-Flute Cutters: This tool is the gold standard for acrylic cnc machining. The large single flute provides maximum chip clearance. This design evacuates hot plastic chips instantly before they can melt and weld to the tool.
- Polished Carbide Bits: Choose solid carbide cutters with mirror-polished flutes. A smooth flute surface reduces friction, which prevents heat buildup.
- Upcut Spiral Geometries: Upcut tools pull chips upward out of deep slots or pockets. This action prevents chip recutting, which is a major cause of edge melting.
Safety Equipment and Precautions
Safety is paramount during high-speed machining. CNC milling of acrylic generates sharp, flying plastic debris and fine micro-plastics. Operators must wear ANSI-approved safety glasses and face shields.
Ensure your CNC enclosure has an active dust collection system. This system removes airborne particulates and prevents slips from accumulated plastic chips. Never wear loose clothing or jewelry near the rotating spindle.
Preparing the Design
Software Options
Creating a precise component begins in the digital workspace. For computer-aided design, industrial engineers typically use SolidWorks, Autodesk Inventor, or Fusion 360.
Once the 3D model is complete, you must import it into computer-aided manufacturing (CAM) software. Programs like Mastercam, Delcam, or Fusion 360 CAM convert the design into specific G-code instructions for your CNC machine.
Compatible File Formats
To ensure accurate geometric data transfer between software platforms, always use standardized, lossless file formats:
- CAD Formats: Use
.STEP,.IGES, or.Parasolidfiles for 3D solid models. - Vector Formats: Use
.DXFor.DWGfiles for flat, 2D profile cutting on CNC routers.
Tips for Effective Design
- Add Radii to Internal Corners: Sharp internal 90-degree corners act as severe stress concentrators. Always add a radius to internal corners that is at least 10% larger than your cutting tool’s radius.
- Maintain Wall Thickness: Avoid thin walls in your designs. Keep structural walls above 1.5 mm ($0.060\text{ inches}$) to prevent the material from flexing or fracturing under cutting pressure.
- Design Shallow Pockets: Deep pockets restrict chip evacuation. Limit your pocket depth to less than 3 times the tool diameter.
Setting Up the CNC Machine
Machine Calibration
Before mounting your acrylic stock, verify that your CNC machine is fully calibrated. Check for axis backlash and ensure the spindle runs true. Spindle runout should measure under 0.01 mm ($0.0004\text{ inches}$).
Excessive runout causes uneven chip loading. This imbalance leads to micro-chipping along your machined edges.
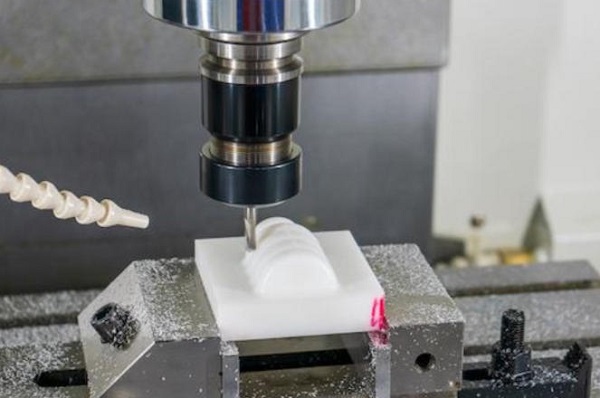
Material Securing Techniques
Acrylic is sensitive to clamping pressure. If you clamp it too tightly, it will crack or warp. If you clamp it too loosely, the material will vibrate, destroying your surface finish.
+------------------------------------------+
|  Vacuum Table / Double-Sided Fixture Tape|
+------------------------------------------+
|               Acrylic Sheet              |
+------------------------------------------+
|             CNC Machine Bed              |
+==========================================+
- Vacuum Tables: This is the best method for large sheets. It distributes holding force evenly across the entire surface, preventing vibration.
- Sacrificial MDF Beds with Tape: For smaller parts, apply high-quality double-sided tape or a combination of painter’s tape and cyanoacrylate (CA) glue to a flat MDF spoiler board. This secures the part uniformily without edge clamps.
- Padded Vises: If you must use a standard machining vise, place soft aluminum or rubber jaws between the vise and the acrylic to distribute the load.
Tool Installation
Clean your tool holders and collets with isopropyl alcohol before inserting the cutter. Any debris inside the collet increases runout.
Minimize tool deflection by seating the tool as deeply into the collet as possible. Keep the tool stick-out length short. A short cutter is a rigid cutter.
Machining Process
Step-by-Step Instructions
- Load Code and Material: Upload your CAM G-code to the machine controller and secure your cast acrylic sheet.
- Set Work Coordinate System (WCS): Zero your X, Y, and Z axes accurately using a touch probe or feeler gauge.
- Verify Coolant Delivery: Position your air blast nozzle or cold air gun to point directly at the tool’s cutting edge.
- Execute an Air Cut: Run the program 50 mm above the material surface. Verify the tool path matches your expectations.
- Begin Machining: Start the spindle, engage the feed rate override at 50%, and execute the cut. Once you confirm smooth chip evacuation, increase the feed rate to 100%.
- Perform Roughing and Finishing: Always leave 0.25 mm to 0.5 mm of material for a final finishing pass. The roughing pass clears the bulk material, while the light finishing pass creates a smooth, clear edge.
Recommended Speeds and Feeds
To prevent melting, you must maintain a correct chip load. This means your tool must move forward fast enough to cut a clean chip, rather than rubbing against the plastic. Rubbing generates friction, friction generates heat, and heat melts acrylic.
$$Feed \ Rate \ (VF) = RPM \times Number \ of \ Flutes \times Chip \ Load$$
Use the following starting parameters for high-quality acrylic cnc machining:
| Tool Diameter | Spindle Speed (RPM) | Feed Rate (mm/min) | Chip Load per Tooth | Cut Type |
| 3.175 mm (1/8″) | 18,000 | 1,800 – 2,200 | 0.10 mm – 0.12 mm | Roughing |
| 6.35 mm (1/4″) | 16,000 | 3,200 – 4,000 | 0.20 mm – 0.25 mm | Roughing |
| 6.35 mm (1/4″) | 12,000 | 1,500 – 1,800 | 0.12 mm – 0.15 mm | Finishing Pass |
Monitoring the Process
Never leave a CNC machine unattended while cutting plastics. Watch the chips coming off the tool.
If you see large, crisp, snow-white flakes, your parameters are correct. If you see fine white powder, your feed rate is too slow, and the tool is rubbing. If you see stringy, melted ribbons wrapping around the tool, stop the machine immediately. You need to increase your feed rate or lower your spindle speed.
Post-Machining Procedures
Cleaning and Finishing
Once machining is complete, vacuum away loose debris and remove the part from the fixture.
- Deburring: Use a specialized plastic deburring tool to smooth out sharp edges.
- Polishing: To restore optical clarity to machined edges, you can use a high-speed buffing wheel with a specialized plastic polishing compound. Alternatively, a quick pass with a hydrogen-oxygen flame polishing torch can melt away surface micro-scratches, leaving a glass-like edge.
Common Issues and Troubleshooting
Even experienced operators encounter difficulties during acrylic cnc machining. Use this troubleshooting directory to correct your setup when defects occur.
| Problem Observed | Primary Root Cause | Immediate Actionable Solution |
| Melted or Gummy Edges | Spindle speed too high or feed rate too slow | Reduce spindle RPM or increase the table feed rate. |
| Chipped or Fractured Edges | Dull tool cutting edge or excessive machine vibration | Replace cutter with a polished O-flute; check fixture rigidity. |
| Cloudy Surface Finish | Tool rubbing; chip load too low | Increase the feed rate to cut thicker, cleaner chips. |
| Stress Crazing / Cracking | High internal stresses from heat buildup | Introduce an annealing cycle after machining. |
Quality Control Checks
Inspect your finished parts under bright, directional lighting. Use a digital caliper or micrometers to verify dimensional compliance. For critical industrial applications, check the surface roughness ($R_a$) with a profilometer.
If the part requires optical clarity, inspect it for internal stress marks using two crossed polarizing filters.
Applications of Acrylic CNC Machining
Signage and Displays
The advertising industry relies heavily on acrylic cnc machining. It creates premium, edge-lit LED signs, custom point-of-purchase (POP) retail displays, and architectural channel letters.
The material’s transparency makes it an excellent choice for modern interior and exterior branding.
       +---------------------------------+
       |      Moshijia Technology        |  <-- Crisp, CNC-Engraved Acrylic
       |   [Precision Engineered Parts]  |
       +---------------------------------+
         ||                           ||
Custom Fabrication Projects
Product designers use acrylic to build custom enclosures for electronics, scientific exhibition models, and bespoke museum display cases. CNC routers can quickly slice complex nested panels from large sheets with minimal material waste.
Industrial and Commercial Uses
In engineering sectors, precision-machined acrylic is vital. It is used to manufacture microfluidic chips, medical manifolds, clear sight glasses for pressure vessels, and optical lenses.
Its chemical resistance allows these parts to perform reliably in sterile lab environments.
Tips for Successful Acrylic CNC Machining
Best Practices for Efficiency
- Use Ramp Ingress: Never plunge a rotating CNC tool vertically directly into acrylic. This action traps heat and cracks the material. Always program a ramp or spiral entry at an angle of 10 to 15 degrees.
- Keep Tools Separate: Dedicate a specific set of solid carbide O-flute cutters exclusively for plastics. Never use an acrylic cutter to mill aluminum or wood, as this dulls the micro-sharp cutting edge.
Common Mistakes to Avoid
- Avoid Standard Lubricants: Never use standard WD-40 or oil-based cutting fluids on acrylic. These petroleum-based hydrocarbons cause immediate stress cracking (crazing) across the plastic.
- Do Not Re-Cut Chips: Ensure your compressed air blast clears chips out of the cutting path immediately. Re-cutting old plastic chips generates immense friction and guarantees a melted surface finish.
Maintenance of CNC Equipment
Keep your CNC machine clean. Plastic dust can mix with linear rail grease, creating a abrasive paste that accelerates machine wear.
Clean and lubricate your ball screws and linear guides weekly to ensure smooth, vibration-free movement.
Conclusion
Mastering acrylic cnc machining requires balancing cutting speed, feed rate, tool geometry, and material selection. By choosing high-quality cast acrylic, using sharp single-flute carbide O-flute tools, and maintaining a high chip load, you can completely eliminate melting and cracking issues.
Implementing these steps allows you to consistently produce high-precision components with beautiful, optically clear finishes.
Frequently Asked Questions (FAQ)
Can I use a standard two-flute twist drill bit to drill holes in acrylic? No. Standard twist drill bits have a 118-degree point angle designed to cut metal. This geometry pulls the tool into the plastic, causing the acrylic to crack as it exits the back of the hole. Instead, use a specialized plastic drill bit with a sharper 60-to-90-degree point angle and a 0-degree rake angle to scrape the material cleanly.
What is the best coolant to use during acrylic cnc machining? The safest and most effective coolant is a continuous stream of clean, compressed air. A cold air gun drops the air temperature to sub-zero levels, cooling the tool and evacuating chips simultaneously without chemical risks. If you need a liquid coolant, use water mixed with a small amount of specialized water-soluble plastic coolant. Avoid solvent-based or petroleum-based fluids.
Why did my acrylic part crack several hours after I finished machining it? This is caused by residual internal mechanical stress, a phenomenon known as stress crazing. High cutting temperatures and mechanical forces leave invisible stresses locked inside the polymer matrix. When exposed to internal stresses or ambient moisture, the material cracks over time. To prevent this, anneal your parts in an oven at 80°C for two hours after machining, then let them cool down slowly.
Get projects quote with Moshijia Technology
Do you need precision-engineered plastic components with flawless surface clarity? Partner with the experts at Moshijia Technology. Our team of product engineers specializes in advanced acrylic cnc machining, utilizing state-of-the-art CNC mills and specialized tooling. We ensure strict ISO 9001:2015 quality control, ultra-smooth finishes, and rapid turnaround times for your prototypes and production runs.