As an engineer who has spent years on the shop floor, I’ve seen the same costly errors repeat themselves. You start a batch of parts, the machine is humming, and then you find the scrap bin filling up with out-of-tolerance components. Frustrating, right? The root cause is rarely the machine itself. Instead, it’s often a series of small, avoidable mistakes in process planning and execution. This post breaks down ten common precision machining errors. My goal is to give you practical, real-world fixes to keep your spindle turning and your tolerances tight.
Ignoring Material Stress
Every piece of metal holds internal stress. When you machine one side, this stress releases and the part warps. I once saw a shop lose an entire order of aluminum base plates because they removed 80% of the material from one face without stress-relieving first. The parts curled like potato chips.
The fix is strategic stock removal. Always rough out both sides equally. For critical work on alloys like 6061-T6 or tool steel, you need a stress-relief cycle before finishing. A typical rule is to rough the part, leaving 0.25 mm for finish, then unclamp and let it move. Your finish pass then cleans up the distortion. This sequence is not optional for flatness tolerances under 0.05 mm. You must break the chip from the parent metal without letting the stored energy ruin your geometry.
Dull Tool or Wrong Grade
A dull tool kills your efficiency and your surface finish. It builds up heat, which work-hardens the material and damages the feature you are trying to cut. The mistake is not just using a dull tool; it’s choosing a general-purpose grade when your job demands a specific one. Pushing a standard uncoated carbide end mill into stainless steel 316 is a recipe for built-up edge and tool failure.
You need to match the carbide grade and coating to the material. For abrasive materials like high-silicon aluminum, a diamond-like carbon coating or PCD tool resists wear. For heat-resistant superalloys (Inconel), an AlTiN coating with a high-hot-hardness substrate is mandatory. Don’t wait for sparks. Set a tool-life management target. For instance, if a tool cuts 20 good parts, replace it at 18. Data-based tool changes are always cheaper than scrapping a high-value part.
High Speed, Fat Feed
Running speeds and feeds by “feel” is a quick path to disaster. Many operators think slower is safer, but low chip loads cause rubbing. That rubbing generates friction, not a clean cut. Conversely, too much speed burns the cutting edge instantly.
You have to respect the chip load calculation (Feed Rate = RPM x Flute Count x Chip Load). Read the tool manufacturer’s data for that specific tool and stick to it. A common mistake is using the same load for a long-reach tool as a rigid stub tool. If your tool stick-out is 4x diameter, you must reduce your speed by 30% to avoid harmonic chatter. Start at the conservative end of the chart and listen. A steady hiss means you are cutting; a scream means you are breaking something.
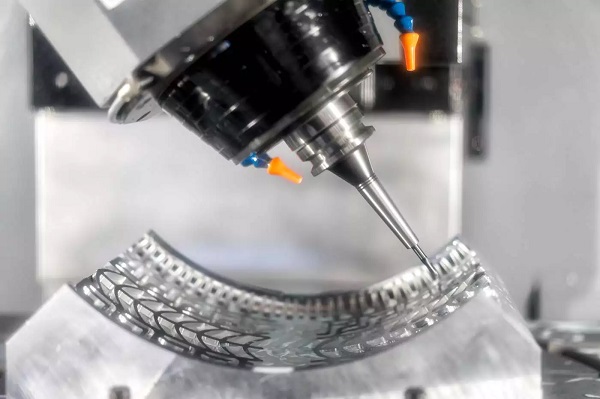
Skipping Chip Evacuation
Recutting chips is a guaranteed way to fail. Nests of stringy chips wrapping around a tool trap heat and cause immediate thermal cracking. This is especially lethal in deep pocket milling and when working with gummy materials like copper or low-carbon steel.
High-pressure coolant delivery is your primary solution. Aim for through-tool coolant whenever your budget allows. If you must use flood coolant, position the nozzle precisely at the relief angle. For horizontal machining, use chip conveyors and make sure your dwell cycles allow chips to fall away. Never let a cloud of razor-sharp tool chips surround your tool path. If you are static turning, switch to a chipbreaker geometry. A chip that breaks clean into a tight coil prevents catastrophic bird-nesting.
Bad Workholding Logic
A part that vibrates cannot be accurate. The error here is treating workholding as a brute-force clamp rather than a precision engineering problem. Clamping a thin-walled ring in a standard three-jaw chuck distorts it into a triangle. It measures round on the machine, but when you release it, the tolerance stack fails.
Embrace stiffness and minimal deformation. Use pie jaws for thin-wall turning, or switch to a magnetic chuck for flat plates. Milling requires matched parallels and torque wrenches. Tightening a bolt to 40 ft-lbs instead of the specified 20 can lift a corner. For fixture design, ensure the force loop is closed and you locate against fixed stops. The part must have zero freedom to move. Vibration-damping tool holders are also worth the investment for long assemblies.
Neglecting Thermal Growth
All machines drift with temperature. If you inspect a cold part taken from a warm machine, you are measuring a phantom. A steel part machined at a 30°C rise will measure about 18 microns larger per 25 mm than at room temperature. That discrepancy crashes tight ISO fits.
Let your machine warm up. Run the spindle for 20 minutes before cutting first-article parts. Stabilize your shop temperature, ideally to 20°C. For micron-level accuracy, you need in-process probing. Touch the part, update the work offset, and adjust for the thermal growth automatically. Don’t trust that the coolant tank isn’t also heating up. Stable oil temperature keeps the machine structure predictable. Tight bore tolerances demand this discipline.
Ignoring Tool Runout
You can never hold a tight tolerance if your tool holder has runout. Mechanical dial indicators often miss micro-level vibration, which kills the periphery flutes of small end mills. If a 0.5 mm end mill has 10 microns of runout, only one flute cuts. The tool loads unevenly, deflects, and snaps immediately.
Check assembly cleanliness obsessively. Wipe the spindle taper and holder shank with a lint-free cloth. Use a calibrated shrink-fit or hydraulic holder to achieve under 3 microns of runout. Measure it with a static tester off the machine, and then confirm under rotation. This is the only way to make fine engraving tools and micro-drills survive. Uniform tooth loading equals a predictable tool life and perfect surface results.
The “Perfect Pass” Trap
Trying to hit final size with one single finish pass is a risky bet. Tool pressure changes based on stock variation. If your roughing stock leaves a heavy spot, the finish tool deflects, creating a tapered or wavy profile. You lose control of the process.
Use a semi-finish or “spring” pass strategy. Leave a consistent stock, often 0.1–0.15 mm, for the finish tool. Then, program an identical second pass at the final size to clean up the deflection. This zero-cutting-pressure pass removes the taper. It adds a few seconds but locks in the consistent tolerance. If your diameter is still growing, check your insert nose radius. A larger radius requires higher pressure and causes more deflection in slender work.
Poor Coolant Focus
Flooding the general area is not cooling the cut. The heat zone is exactly where the chip shears off. If coolant hits the hot chip but misses the intersection, you get thermal shock, which leads to edge line fractures and premature edge wear. Gummy material then clings to the warm insert.
Precision-target the jet. The coolant needs to blast the rake face at high pressure to lift the chip. For difficult turning, you must hit the clearance side too. Never let the jet wander. Integrate programmable coolant nozzles if you run varied parts. For milling slots, mist systems fail here. You need a direct flood to evacuate heat from deep pockets; otherwise, tool life drops by half.
Skipping the Setup Sheet
The biggest mistake happens before the spindle starts. Relying on memory or a stained napkin for a complex setup invites human error. A missing step in tool setup or work offset entry causes a crash or slow-burn scrap that takes hours to detect.
A digital setup sheet bridged to your CAM software is non-negotiable. Document every tool assembly length, the torque value of every nut, and the probe cycle sequence. Use control simulation. A standardized checklist prevents skipping the warm-up routine or the coolant-fill check. Write it, work it, and audit it. Consistent pre-production discipline is the most effective way to avoid precision machining mistakes entirely. No guesswork.
Conclusion and Quick Checklist
Mastering precision machining means removing variables. It’s about controlling heat, forces, and human input. When you walk through the process logically, scrap rates plummet. Before you start your next job, run through this quick validation:
- Did I rough both faces to release stress?
- Is the exact tool grade and coating in the setup?
- Are my speeds and feeds from the tool catalog, not a guess?
- Are chip conveyors or nozzles clearing the path?
- Did I torque the fixtures and damp the vibration?
- Did the machine and coolant stabilize at operating temperature?
- Is my tool holder runout under 3 microns?
- Did I schedule a spring pass before final sizing?
- Is my coolant stream locked on the cutting zone?
- Is my digital setup sheet at the controller?
Frequently Asked Questions
Why do my parts pass inspection on the machine but fail later?
Thermal expansion is the usual cause. Hot metal measures differently than cold metal. Always let parts cool to your standard reference temperature (20°C) before final inspection, or use the thermal compensation table in your probe routine.
How do I stop my small drills from breaking constantly?
Focus on high-precision holders, like shrink-fit, to eliminate runout. If a small drill has any runout, one lip does all the work. Combine this with doubled feed rates to ensure penetration, not rubbing, and use pecking cycles to clear the tiny chips.
When is it worth investing in high-end tooling?
The math is simple. If the cycle time saved on a current job beats the tool cost, it’s necessary. Also, if a standard tool cannot hold a specific surface finish or tolerance due to deflection, high-price, high-performance tooling, like damped boring bars, is your only profitable option.
Get project quotes with Moshijia Technology
Don’t let process errors delay your production. At Moshijia Technology, we understand the critical details of stable, high-quality milling and turning. We provide detailed DFM feedback and tight-tolerance part runs backed by documented process control. Ready to eliminate scrap? Contact us for a project quote today.