LED Lamp Holder Die Casting Mold
Case introduction
If you are struggling with short mold life, poor heat dissipation, or high precision failures in LED lamp holder production, you’re not alone. The real solution lies in a well-engineered aluminum die casting mold—designed specifically for LED lighting components. Based on our hands-on experience at Moshijia Technology, the right mold design, material selection, and process control can extend tool life by 40-60% while maintaining ±0.02mm accuracy. Let me guide you through exactly what works.
What Makes LED Lamp Holder Molds So Demanding?
LED lamp holders are not ordinary metal parts. They require tight tolerances for proper LED chip alignment, smooth surfaces for light reflection, and reliable heat dissipation to prevent premature LED failure.
Typical challenges include:
- High-temperature aluminum flow (over 600°C) causes thermal fatigue
- Thin-walled structures (some as thin as 1.2mm) demand precise filling
- Complex internal features like pin holes and positioning bosses
- Consistency requirements for multi-cavity production
Without addressing these, you face rejected parts, frequent mold repairs, and rising per-unit costs.
Why Choose Aluminum Alloy for LED Lamp Holders?
Aluminum alloys—especially A380, ADC12, and A413—dominate LED lighting applications. Here’s why:
| Property | Benefit for LED Lamp Holders |
|---|---|
| High thermal conductivity (96-120 W/m·K) | Efficient heat dissipation from LED chips |
| Lightweight (2.7 g/cm³) | Easy mounting and shipping |
| Corrosion resistance | Long product life in humid environments |
| Good fluidity | Fills thin walls and complex shapes |
| Cost-effective for high volumes | Lower per-part cost above 5,000 units |
Real-world data: Using ADC12 aluminum, our clients achieve 150,000–200,000 shots per mold with proper maintenance—compared to only 80,000–100,000 with poor design choices.
How Does Our 20-30 Day Mold Manufacturing Work?
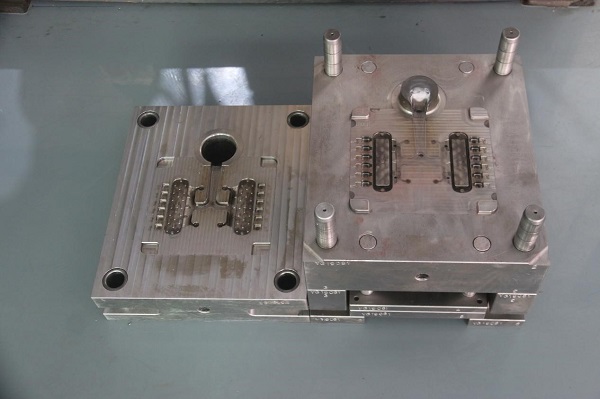
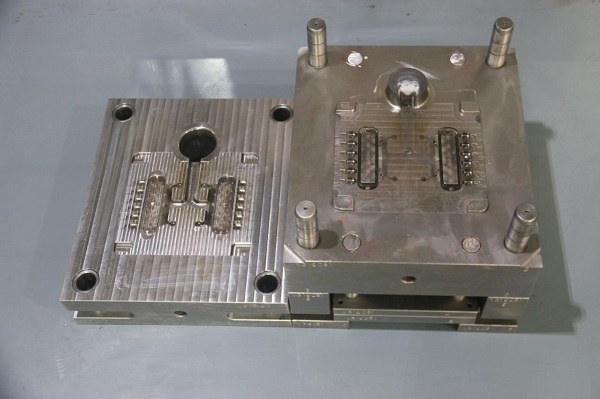
Let me walk you through the actual production process for a 350mm x 300mm mold base with 2 cavities. Each step is critical for final accuracy.
Step 1: CNC Roughing (0.3-0.5mm Stock Left)
We start with SKD61 (H13) mold steel. First, CNC milling machines rough-cut:
- Moving and fixed mold plates
- Guide pin holes and water channels
- Screw holes and cavity contours
We intentionally leave 0.3-0.5mm finishing stock—this prevents distortion during heat treatment.
Step 2: Component Rough Machining
All standard and custom parts get their basic shapes:
- Guide pins and bushes
- Ejector pins
- Sprue bushings
- Locating rings
Step 3: Vacuum Quenching + Multiple Tempering
This is where durability happens. We heat-treat the core cavity components to HRC 48-52 using vacuum furnaces. Why vacuum? No oxidation, no decarburization.
Then we perform multiple tempering cycles to:
- Release internal stresses
- Improve toughness
- Ensure stability at 600°C+ aluminum冲击 temperatures
Step 4: Low-Temperature Aging
Many shops skip this. We don’t. Aging at low temperatures eliminates residual stresses from both quenching and rough machining. Result? Zero deformation over hundreds of thousands of cycles.
Step 5: Quality Inspection After Heat Treatment
Every part is tested:
- Hardness check (HRC target achieved)
- Metallographic analysis (correct microstructure)
- Flaw detection (no cracks, no hidden defects)
Only passed components move forward.
Step 6: CNC Finishing (±0.02mm Accuracy)
Now we machine all final dimensions. Critical requirements:
- Cavity contour accuracy: ≤0.02mm
- Guide pin hole alignment: ≤0.015mm
- Water channel positioning: ±0.1mm
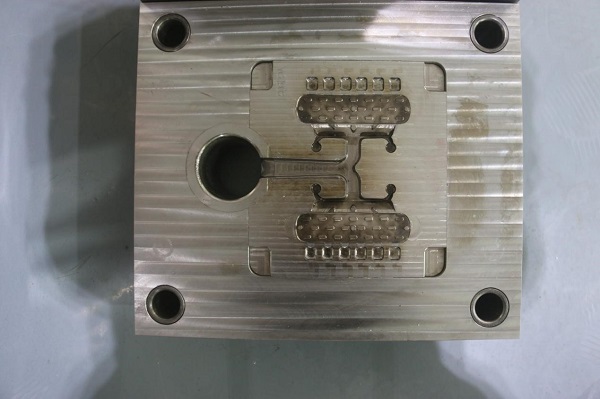
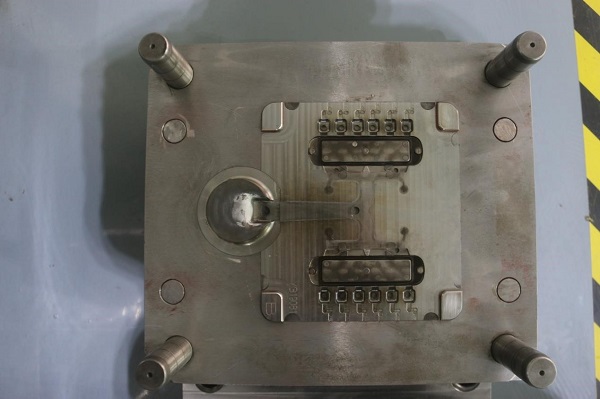
Both cavities match 100% identically—essential for uniform LED holder quality.
Step 7: EDM for Complex Details
Tiny pin holes, positioning bosses, and thin ribs? CNC can’t handle them all. Electrical Discharge Machining (EDM) creates these精密 features with:
- ±0.01mm precision on fine details
- Excellent surface finish for LED chip mounting
- Burr-free edges for safe assembly
Step 8: Surface Grinding for Perfect Sealing
We grind reference surfaces and parting lines on precision surface grinders. Targets:
- Flatness: ≤0.01mm
- Parallelism: ≤0.01mm
Why so tight? Because a perfect parting line means no flash, less trimming, and consistent part weight.
Step 9: Mirror Polishing + Ion Nitriding
This two-step surface treatment transforms mold performance:
| Process | Result | Benefit |
|---|---|---|
| Mirror polishing (Ra≤0.8μm) | Glass-like cavity finish | Smooth LED holder surface, no aluminum sticking |
| Ion nitriding | Surface hardness HRC 60+ | 3x longer mold life, wear resistance |
The nitrided layer is hard, thin, and dense—reducing soldering and erosion from high-velocity aluminum flow.
Step 10: Deburring + Ultrasonic Cleaning
Every component is deburred, chamfered, and ultrasonically cleaned. No oil, no chips, no contamination before assembly.
What’s the Best Steel for LED Lamp Holder Molds?
SKD61 (equivalent to H13) is our proven choice. Here’s the data:
| Property | Value | Why It Matters |
|---|---|---|
| Hardness after tempering | HRC 48-52 | Balances wear resistance and toughness |
| Heat resistance | Withstands 600°C+ | No softening from molten aluminum |
| Thermal conductivity | 24.3 W/m·K | Helps cool mold evenly |
| Toughness | High | Resists cracking from thermal cycling |
| Polishability | Excellent | Achieves Ra≤0.8μm finish |
Alternative: For extremely high-volume production (500,000+ shots), consider DAC55 or Dievar—but expect 30-40% higher tooling cost.
How to Optimize Die Casting Parameters for LED Holders?
Even the best mold fails with wrong parameters. Based on our field data:
| Parameter | Recommended Range | Impact on LED Holder Quality |
|---|---|---|
| Melt temperature | 620-650°C | Lower = cold flow; Higher = soldering |
| Mold temperature | 180-220°C | Consistent fill and solidification |
| Injection speed | 2.5-4.0 m/s | Thin walls need higher speed |
| Intensification pressure | 80-100 MPa | Reduces porosity |
| Cycle time | 35-50 seconds | Balances quality and output |
Pro tip: Use a thermal imaging camera during first 50 shots. Cold spots cause sticking and short fills.
How to Extend Mold Life and Control Costs?
Let me share real maintenance strategies from our shop floor:
Preventive Maintenance Schedule
- Every 5,000 shots: Clean cavity, check cooling channels
- Every 20,000 shots: Inspect parting line for wear
- Every 50,000 shots: Measure critical dimensions, check nitrided layer
- Every 100,000 shots: Professional re-polish and re-nitride (if needed)
Cost-Saving Tips
- Start with 2 cavities instead of 4 for new products—lower risk, easier tuning
- Use standardized mold bases (LKM or Hasco) to reduce machining time by 30%
- Add spare inserts for wear-prone areas—replace only the worn section
- Install a mold temperature controller—reduces thermal shock by 50%
Real example: One client reduced annual mold maintenance costs from $18,000 to $9,500 simply by adding thermal controllers and following our 20,000-shot inspection schedule.
Conclusion
A high-performance LED lamp holder die casting mold is not about the most expensive steel or the fastest CNC. It’s about systematic engineering—from material selection (SKD61, HRC 48-52) to precision machining (±0.02mm) to surface treatment (mirror polish + ion nitride).
By following the processes outlined here—especially the 10-step manufacturing sequence and proper maintenance—you can achieve 150,000+ stable shots, eliminate flash and sticking issues, and deliver LED lamp holders with excellent thermal performance and dimensional consistency.
At Moshijia Technology, we have built our reputation on solving these exact challenges. Your mold isn’t just a tool; it’s the foundation of your LED product quality.
FAQ
What is the typical lead time for an LED lamp holder die casting mold?
For a standard 2-cavity mold (350mm x 300mm base), our lead time is 20-30 days—including design, CNC roughing, heat treatment, finishing, EDM, polishing, nitriding, and assembly. Complex 4-cavity molds may take 35-40 days.
How many shots can I expect from a properly made LED lamp holder mold?
With SKD61 steel, proper heat treatment (HRC 48-52), and ion nitriding (surface HRC 60+), expect 150,000–200,000 shots before major refurbishment. Regular maintenance every 20,000-50,000 shots extends this significantly.
Why is mirror polishing (Ra≤0.8μm) important for LED lamp holder molds?
Mirror polishing prevents aluminum from sticking (soldering) to the cavity, ensures smooth part ejection, and gives LED lamp holders a clean, reflective surface. Rough cavities cause drag marks, poor aesthetics, and shorter mold life.
Can you reduce the mold cost without sacrificing quality?
Yes. Use standardized mold components, limit cavities to 2 for new designs, and optimize cooling channel layout. These steps can reduce tooling cost by 20-30% while maintaining ±0.02mm accuracy and 150,000-shot minimum life.